Want to become an expert in VBA? So this is the right place for you. This blog mainly focus on teaching how to apply Visual Basic for Microsoft Excel. So improve the functionality of your excel workbooks with the aid of this blog. Also ask any questions you have regarding MS Excel and applying VBA. We are happy to assist you.

Microsoft Edge

Microsoft introduced a new browser called “Microsoft Edge” with their Windows 10 release. Now Microsoft edge is the default browser for the Windows 10.


Find Microsoft Edge in Windows 10 start menu

After that lots of people got a question whether they can do web scraping using this new browser, like they did with the Internet explorer. For an example below is a very simple code we can use to automate internet explorer. It will open the Internet explorer window and navigate to the http://www.example.com. So can we do a similar program for Microsoft Edge?

Web scraping vba code for Internet explorer

Unfortunately as of today, 30th December 2020 Microsoft Edge still doesn’t support this kind of automations. So we can not create direct VBA programs to automate Microsoft edge. However, thanks to a developer(github user - florentbr) you can use a selenium based solution to automate Microsoft Edge. He has created a wrapper for Selenium which we can use for VBA projects. You can download that repository from github from the link below.

SeleniumBasic

Also note that internet explorer is also a built in component in Windows 10. So if you want to use the Internet explorer then you don’t need to install anything. You can readily use it.

Also see
    Learn when to use the getElementsByClassName method in web scraping
    How to scroll a web page number of pixels

Also it is possible to develop web scraping programs inside Excel in Windows 10 for Internet explorer like in other Windows versions. However some users are having problems finding this feature. If you also have difficulty finding the Internet explorer, simply follow these steps.

Click on the search box.

Click on Windows 10 search box to find Internet explorer

Then search for the Internet explorer.

Search for Internet explorer feature in Windows 10

VBA With Statement (Excel VBA)

With statement is a widely used statement in VBA. With statement is used to execute one or more statements on an object or on a user defined type. Also it is mandatory to use “End With'' after the statements. So this is the Syntax of the With statement.

With object
     Statements
End With

Now let’s look at how to use With statements in VBA projects. Let’s consider this sample form.

Suppose that we want to create the drop down list of the “Gender” combobox. We can do that using a With statement as follows. Name of the combobox is cboGender.

Private Sub UserForm_Initialize()

     With cboGender
         .AddItem "Male"
         .AddItem "Female"
     End With

End Sub

According to above code, items are added to the dropdown list when the form is initialized. So this is what will happen when you click on the dropdown icon of the “Gender” combobox.

So in the above example code, we referred to the combo box once as we used the With statement. So if we rewrite that code without a With statement we have to refer to it twice like this.

Private Sub UserForm_Initialize()

     cboGender.AddItem "Male"
     cboGender.AddItem "Female"

End Sub

So if we want to add lots of items to a combobox and if we don’t use a With statement then we have to refer to the combobox many times. But if we use With statement we can refer to the combobox once and add any amount of items to the list.

We can also use the With statement for objects related to the worksheets as well. First let’s look at how to delete a sheet using a With statement. Suppose we have a workbook with 5 sheets like this.

Following is the macro which uses the With statement to delete a worksheet. In this example macro is used to delete “Sheet4”.

Sub DeleteSheet()

Dim WS As Worksheet

    Set WS = Worksheets("Sheet4")

    Application.DisplayAlerts = False

    With WS
         .Delete
    End With

    Application.DisplayAlerts = True

End Sub

This would be the result after running the macro.

Next let’s see how we can use the With statement for Range objects. We will use Range(“C5”) for this example.

Below subroutine can change the value and can do some small changes to the formatting of the range.

Sub RangeExample()

     With Range("C5")
         .WrapText = True
         .ColumnWidth = 25
         .Value = "VBA With Statement - www.excelvbasolutions.com"
     End With

End Sub

Here is the result of the above macro.

Also you can use nested With statements in your subroutines as well. Here is an example.


Sub NestedWithStatementExample()

     With Range("B3")

         .Value = "Test"
         With .Font
             .Name = "Calibri"
             .Size = 16
             .Bold = True
             .Underline = xlUnderlineStyleSingle
             .Color = vbRed
         End With

     End With

End Sub

This is the result of the above example subroutine.

Note that you have to use dot(.) before the object in the inner With statement. So in the above example we used

With .Font

Instead of

With Font

How to Use For Each Next in Excel VBA

For Each Next Statement is used to execute one or more statements on each item in a collection or array. So this is the syntax of the For Each Next statement.

For Each element in Collection/Array
     Statements
Next

However if you want you can add the "element" in the "Next" line as well. So then the syntax would be like this.

For Each element in Collection/Array
     Statements
Next element

Now let’s look at how to use this statement in programs. Consider this sample excel sheet.

We have values here and there in this worksheet. So in this example we are going to color the cells which have values greater than five in yellow color. So the end result should look like this.

To do that we need to execute some statements on all the cells in the used range. So we can do that using For Each Next statement as follows.

Sub ForEachExample()

     Dim Rng As Range

     For Each Rng In ActiveSheet.UsedRange
         If Rng.Value > 5 Then
             Rng.Interior.Color = vbYellow
         End If
     Next

End Sub

In the above code we execute the following statement on all the cells in the used range.

If Rng.Value > 5 Then
     Rng.Interior.Color = vbYellow
End If

Also if we need, we can use “Next Rng” instead of “Next” as well. So then the For Each statement would look like this.

For Each Rng In ActiveSheet.UsedRange
     --------------------
     Statements
     --------------------
Next Rng

Next let’s look at how to use For Each statement for an array. I will explain it using the following Excel sheet.

This excel sheet has numbers and text in column A. We are going to write whether the value is numeric or non-numeric in column B. First we add the content of range A1:A10 to an array called “MyArray”. Then execute the set of statements on each element of the array. So the completed subroutine will look like this.

Sub ForEachExample2()

     Dim WS As Worksheet
     Dim MyArray() As Variant
     Dim elm As Variant
     Dim Counter As Integer

     Set WS = ActiveSheet
     MyArray = WS.Range("A1:A10")

     Counter = 1
     For Each elm In MyArray
         If IsNumeric(elm) = True Then
             WS.Range("B" & Counter).Value = "Numeric"
         Else
             WS.Range("B" & Counter).Value = "Non-Numeric"
         End If
         Counter = Counter + 1
     Next

End Sub

Here following statements are executed on each element of the array.

If IsNumeric(elm) = True Then
     WS.Range("B" & Counter).Value = "Numeric"
Else
     WS.Range("B" & Counter).Value = "Non-Numeric"
End If
Counter = Counter + 1

Subroutine has used IsNumeric function to check whether the value is numeric or not. So this would be the result of the above macro.

Note that if we use For Each Next statement for collection, then the element variable should be either variant or an object. However if we use that statement for an array then the element variable should be only a variant.

You can also use “Exit For” inside the For Each Next statement to exit the loop when a certain condition is met after the evaluation. Consider this sample excel sheet. This sheet contains 8 colors in row A. What we are going to do is find where the word “Yellow” is in, and then output the row number of that cell.

We can do that using the code below. Here we have used a custom range instead of UsedRange.

Sub ForEachExample3()

     Dim DataRange As Range
     Dim Rng As Range

     Set DataRange = ActiveSheet.Range("A1:A8")
     For Each Rng In DataRange
         If Rng.Value = "Yellow" Then
             MsgBox "Yellow is in row " & Rng.Row
             Exit For
         End If
     Next Rng

End Sub

This is the result of the subroutine “ForEachExample3”.

You can use “Exit For” anywhere inside the For Each Next statement depending on your requirement. If a program executes to the "Exit For" then it will give control to the statement immediately following the “Next”. In the above example to the "End Sub" as there are no any other statements.

Add an Excel Macro to a Workbook

This post is for absolute beginners who are new to Excel VBA macros. There are lots of useful vba macros readily available on the internet. Or sometimes you may receive such macros from your friends via emails. If you are an absolute beginner for VBA macros you might don’t know how to add those macros to your existing workbook. So in this lesson I will show you how to add such macro to your existing workbook.

Assume you received the following code from a friend via email.

Sub ListAllCombinations()

Dim counter As Long

counter = 1
For i = 1 To 4
     For j = 1 To 4
          For k = 1 To 4
               Range("E" & counter).Value = _
               Range("A" & i).Value & "" & Range("B" & j).Value & "" & Range("C" & k).Value
               counter = counter + 1
          Next k
     Next j
Next i
End Sub

What this code does is it lists all the possible combinations from columns A, B and C into column E. Above macro is only for the first 4 rows. Let’s assume this is your current workbook.

Existing excel workbook with data

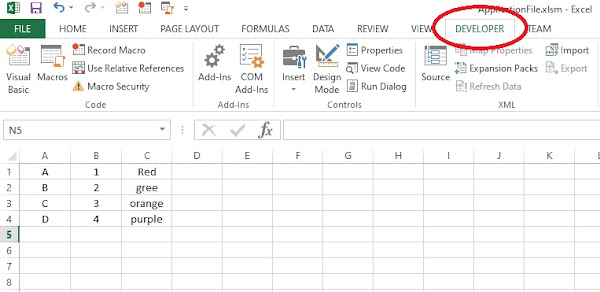
Now let’s look at how to add that above code to the file. First you need to go to the “Developer” tab.

Developer tab in Excel ribbon

If the “Developer” tab is unavailable in your Excel application then read this post to see how to enable it.

How to show the Developer tab

Next click on the “Visual Basic” in the “Code” group.

Visual basic icon in the code group

It will take you to the VBA editor.


VBA editor

Next click on the insert menu.

Insert menu

Select module.

Select module

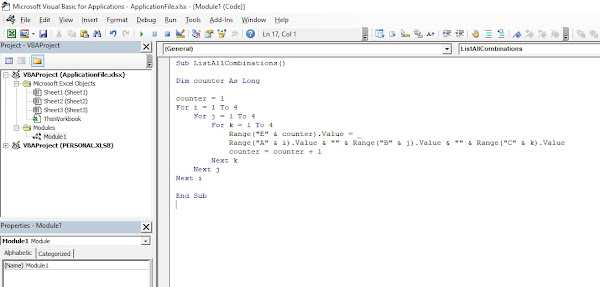
A new module will be added to the VBA Project.

New module in the VBA project

You can delete “Option Explicit” for now. Otherwise you will get errors if any of the variables are not declared. Then you can paste the macro inside this new module.

New excel macro inside the new module

Now the new macro is added to the existing workbook. If your existing file is a .xlsx file then you will need to save it as a .xlsm or any other macro supporting file format. Here are the different combinations you will get when you run the macro.

Result sheet after running the macro

Record a Macro in Excel

Did you know that you can automate repetitive tasks using Excel macros? In this lesson I will teach you how to record a macro in Excel. Record macro is a great tool available in the Microsoft Excel application. It lets the user record all the manual tasks performed. Then that whole process can be executed again and again by one click. So you can understand how much this single tool can save. However this macro recorder tool has some limitations. But if you learn basic concepts of the VBA, then you will have endless opportunities to increase productivity.

Also if you are a programmer, you can use this “Record macro” tool to easily figure out ways to automate some specific tasks. For an example assume that you don’t know how to develop a code to delete a row. Then you can use this tool to find the way to do that. However note that the codes generated by the macro recorder are not always efficient. But it will be a really helpful tool if you are a beginner.

Record macro tool is not only available in Excel but also in some other VBA supporting applications like Microsoft Word and Powerpoint as well.

So now let’s look at how to record a macro in Excel. To do that, first we need to go to the Developer tab. Developer tab is not visible in default settings in Excel. So if you haven’t used the Developer tab before then you will need to show it first. This post explains how to show the developer tab in Excel.

How to show the Developer tab in Excel 2013

Once the Developer tab is enabled you can view all the tools available in that tab.

Now I am going to use the record macro tool for the following process.

  • Create new sheet
  • create a table inside that sheet. (this will be a two column table)
  • Write the headers (subject and marks).
  • Add 11 subjects in the first column.
  • Add the sum function at the bottom of the second column.
  • Format the table.

So this is complete process I am going to record using the record macro.

To start recording the macro we need to click on the “Record Macro” in the “ Code” group.

Once you click on that, a Record macro window will open like this.

Now you can give a name to your macro. Keep in mind that you can not use spaces and other invalid characters for the name. Here are all the rules applied to the macro name.


If you want you can add a shortcut key as well. However this is optional and you can proceed without selecting any key. Also there is a drop-down in the window called “Store macro in”. From that dropdown select “This Workbook” if you want to add the macro only to the current workbook. Then you can add a description from the “Description” text box. This is also optional and you can skip it if you don’t want to add description. Then click the OK button to start the recording.

So this is the sample table I created after clicking the record macro.

Once the process is completed you can click on the “Stop Recording” in the “Code” group to stop the recording.

Now the macro recording is completed. You can view the generated VBA code inside the Visual basic editor.

Code is generated inside Module1.

Don’t know how to open the Visual Basic Editor? Then read this post to learn how.

Getting started with Visual Basic Editor in Excel

Following is the complete code generated when creating the above table in a new worksheet.

Option Explicit

Sub MyMacro()

'
' MyMacro Macro
'

'
Sheets.Add After:=ActiveSheet
Range("A2").Select
ActiveCell.FormulaR1C1 = "Accounting"
Range("A3").Select
ActiveCell.FormulaR1C1 = "Art"
Range("A4").Select
ActiveCell.FormulaR1C1 = "Biology"

Range("A5").Select
ActiveCell.FormulaR1C1 = "Business Studies"
Range("A6").Select
ActiveCell.FormulaR1C1 = "Chemistry"
Range("A7").Select
ActiveCell.FormulaR1C1 = "Computer Science"
Range("A8").Select
ActiveCell.FormulaR1C1 = "English Language"
Range("A9").Select
ActiveCell.FormulaR1C1 = "Geography"
Range("A10").Select
ActiveCell.FormulaR1C1 = "History"
Range("A11").Select
ActiveCell.FormulaR1C1 = "Mathmatics"
Range("A12").Select
ActiveCell.FormulaR1C1 = "Physics"
Range("A13").Select
Columns("A:A").ColumnWidth = 20.86
Range("A1").Select
ActiveCell.FormulaR1C1 = "Subject"
Range("B1").Select
ActiveCell.FormulaR1C1 = "Marks"
Range("A13").Select
ActiveCell.FormulaR1C1 = "Total"
Range("B13").Select
ActiveCell.FormulaR1C1 = "=SUM(R[-11]C:R[-1]C)"
Range("A1:B13").Select
Selection.Borders(xlDiagonalDown).LineStyle = xlNone
Selection.Borders(xlDiagonalUp).LineStyle = xlNone
With Selection.Borders(xlEdgeLeft)
     .LineStyle = xlContinuous
     .ColorIndex = 0
     .TintAndShade = 0
     .Weight = xlThin
End With
With Selection.Borders(xlEdgeTop)
     .LineStyle = xlContinuous
     .ColorIndex = 0
     .TintAndShade = 0
     .Weight = xlThin
End With
With Selection.Borders(xlEdgeBottom)
     .LineStyle = xlContinuous
     .ColorIndex = 0
     .TintAndShade = 0
     .Weight = xlThin
End With
With Selection.Borders(xlEdgeRight)
     .LineStyle = xlContinuous
     .ColorIndex = 0
     .TintAndShade = 0
     .Weight = xlThin
End With
With Selection.Borders(xlInsideVertical)
     .LineStyle = xlContinuous
     .ColorIndex = 0
     .TintAndShade = 0
     .Weight = xlThin
End With
With Selection.Borders(xlInsideHorizontal)
     .LineStyle = xlContinuous
     .ColorIndex = 0
     .TintAndShade = 0
     .Weight = xlThin
End With
Range("A1:B1").Select
With Selection.Interior
     .Pattern = xlSolid
     .PatternColorIndex = xlAutomatic
     .ThemeColor = xlThemeColorDark1
     .TintAndShade = 0
     .PatternTintAndShade = 0
End With
With Selection.Interior
     .Pattern = xlSolid
     .PatternColorIndex = xlAutomatic
     .Color = 12611584
     .TintAndShade = 0
     .PatternTintAndShade = 0
End With
With Selection.Font
     .ThemeColor = xlThemeColorDark1
     .TintAndShade = 0
End With
Range("A3:B3,A5:B5,A7:B7,A9:B9,A11:B11").Select
Range("A11").Activate
With Selection.Interior
     .Pattern = xlSolid
     .PatternColorIndex = xlAutomatic
     .ThemeColor = xlThemeColorAccent1
     .TintAndShade = 0.799981688894314
     .PatternTintAndShade = 0
End With
Range("A13:B13").Select
With Selection.Interior
     .Pattern = xlSolid
     .PatternColorIndex = xlAutomatic
     .ThemeColor = xlThemeColorAccent5
     .TintAndShade = 0.399975585192419
     .PatternTintAndShade = 0
End With
Range("E10").Select
Columns("B:B").ColumnWidth = 10.71
Range("A1:B1").Select
Selection.Font.Bold = True
Columns("B:B").Select
With Selection
     .HorizontalAlignment = xlCenter
     .VerticalAlignment = xlBottom
     .WrapText = False
     .Orientation = 0
     .AddIndent = False
     .IndentLevel = 0
     .ShrinkToFit = False
     .ReadingOrder = xlContext
     .MergeCells = False
End With
Range("A13:B13").Select
With Selection.Font
     .ColorIndex = xlAutomatic
     .TintAndShade = 0
End With
Range("B7").Select
End Sub

Using Val Function to Avoid CDbl Type Mismatch Error

In one of our earlier posts we learnt why we sometimes get “Type mismatch” error (Run-time error '13') when we use CDbl function to convert textbox values to double. So there were lots of reasons. One reason was due to no value in the textbox. In other words, if you try to convert the value of a textbox to a double using the CDbl function and if the textbox is empty then you will get a “Type mismatch” error.

Read this post if you want to learn more about CDbl Type mismatch error.

Type Mismatch Error (Run Time Error 13) When Converting to Double

In this post I will show you how you can use the Val function instead of CDbl to avoid this problem. So you will no longer get a “Type mismatch” error when the textbox is empty. So let’s consider the following example.


Sub TotalPriceCalculation()

     Dim Price As Double
     Dim Tax As Double

     Price = CDbl(txtPrice.Value)
     Tax = CDbl(txtTax.Value)

     txtTotalPrice.Value = Price + Tax

End Sub

txtPrice, txtTax and txtTotalPrice are text boxes. txtTotalPrice textbox displays the total value of txtPrice and txtTax values. Note that we are entering the tax amount to the simple calculator. Not the tax percentage. However we will get a “Type mismatch” error if txtPrice or txtTax is empty. To avoid that issue we can modify the above subroutine using Val function as follows.

Sub TotalPriceCalculation()

     Dim Price As Double
     Dim Tax As Double

     Price = Val(txtPrice.Value)
     Tax = Val(txtTax.Value)

     txtTotalPrice.Value = Price + Tax

End Sub

Now if you call the subroutine when the textbox is empty, it won’t give any error. It will show the result in the txtTotalPrice textbox.

However remember that the program will still give a result even if the user enters incorrect values like this.


So this solution may not be suitable for some situations.

IsNumeric Function (VBA Function)

Today’s post is about another very useful vba function called “IsNumeric” function. This function evaluates whether the argument is a number or not. So if all the characters are numeric then IsNumeric function will return True. If any character of the argument is not numeric then the function will return false. However the function will still return true if you use dot(.) as a decimal point or comma (,) as a thousand separator.

IsNumeric is a built-in VBA function. However it is not available in worksheets. You can only use it in the VBA programs. (In VBA editor)

The syntax of the function is as follows. There is one parameter for this function.

IsNumeric(chars)

Parameter is required.

IsNumeric function returns
True - If the argument can be evaluated as number
False - If the argument can not be evaluated as number.

Keep in mind that IsNumeric("4,56") will return true. But IsNumeric("4/56") or IsNumeric("4^56") will return false.

Now let’s look at some examples.

Example 1

Sub IsNumericFunctionExample1()

Dim S As String

S = "156"
Debug.Print IsNumeric(S)

End Sub

Example 2

Sub IsNumericFunctionExamples2()

Dim S As Variant

S = "45.2"
Debug.Print IsNumeric(S)

End Sub

Example 3

Sub IsNumericFunctionExample3()

Dim S As String

S = "www"
Debug.Print IsNumeric(S)

End Sub

Example 4

Sub IsNumericFunctionExample4()

Dim S As String

S = "ww33w"
Debug.Print IsNumeric(S)

End Sub

Example 5

Sub IsNumericFunctionExample5()

Dim S As String

S = "4,565"
Debug.Print IsNumeric(S)

End Sub

Example 6

Sub IsNumericFunctionExample6()

Dim S As String

S = "4/56"
Debug.Print IsNumeric(S)

End Sub

Using the IsNumeric Function to Avoid CDbl Type Mismatch Error

In the last post I explained about one reason why we get “Type mismatch (Run Time Error 13)” when we use the CDbl function. If we try to convert a value of an empty textbox to double then we get Type mismatch error. To solve that we came up with this below solution.


Sub TotalAmountCalculation()

     Dim Amount1 As Double
     Dim Amount2 As Double

     Amount1 = 0
     Amount2 = 0

     If frmInput.txtAmount1.Value <> "" Then
         Amount1 = CDbl(frmInput.txtAmount1.Value)
     End If

     If frmInput.txtAmount2.Value <> "" Then
         Amount2 = CDbl(frmInput.txtAmount2.Value)
     End If

     frmInput.txtTotalAmountPaid.Value = Amount1 + Amount2

End Sub

frmInput is the name of the form. txtAmount1 and txtAmount2 are the names of “Amount 1” and “Amount 2” textboxes. And the txtTotalAmountPaid is the name of the “Total Amount Paid” textbox. Also the “Total Amount Paid” textbox is updated whenever a change takes place in “Amount 1” or “Amount 2” textboxes. Read this post if you like to see full details about the above solution.

CDbl - Type Mismatch Error When Textbox is Empty (How to Solve)

So now we won’t get Type mismatch error when a textbox is empty. But still there is a problem. Assume that the user entered a value like this.

As you can see the user has entered a letter instead of a value. This can happen by mistake. Sometimes users might enter a $ symbol intentionally. But then CDbl can not cast that value to double. If you want to disregard the incorrect values entered by the user, then you can use a subroutine like this. Here we have used a VBA function called “IsNumeric” to check whether the user has entered a numeric value. Value will be converted to a double only if it is numeric.

Sub TotalAmountCalculation()

     Dim Amount1 As Double
     Dim Amount2 As Double

     Amount1 = 0
     Amount2 = 0

     If IsNumeric(frmInput.txtAmount1.Value) = True Then
         Amount1 = CDbl(frmInput.txtAmount1.Value)
     End If

     If IsNumeric(frmInput.txtAmount2.Value) = True Then
         Amount2 = CDbl(frmInput.txtAmount2.Value)
     End If

     frmInput.txtTotalAmountPaid.Value = Amount1 + Amount2

End Sub

Note that you can use IsNumeric(frmInput.txtAmount1.Value) instead of IsNumeric(frmInput.txtAmount1.Value) = True

So then you can rewrite the above code as follows.

Sub TotalAmountCalculation()

     Dim Amount1 As Double
     Dim Amount2 As Double

     Amount1 = 0
     Amount2 = 0

     If IsNumeric(frmInput.txtAmount1.Value) Then
         Amount1 = CDbl(frmInput.txtAmount1.Value)
     End If

     If IsNumeric(frmInput.txtAmount2.Value) Then
         Amount2 = CDbl(frmInput.txtAmount2.Value)
     End If

     frmInput.txtTotalAmountPaid.Value = Amount1 + Amount2

End Sub

Below is a sample result we will get.


Now in this case the user has entered an incorrect value to “Amount 2”. But the program has calculated value ignoring that. But as you can see this is not a good approach. Because if a user enters a non numeric value by mistake then still the program will give a result ignoring it. So the best way to handle this is by giving the warning to the user saying that he/she has entered invalid value. And then the program should not output any result. To do that we can make a change to above subroutine as follows.

Sub TotalAmountCalculation()

     Dim Amount1 As Double
     Dim Amount2 As Double

     Amount1 = 0
     Amount2 = 0

     If frmInput.txtAmount1.Value <> "" Then
         If IsNumeric(frmInput.txtAmount1.Value) = True Then
             Amount1 = CDbl(frmInput.txtAmount1.Value)
         Else
             MsgBox "You have entered incorrect value for Amount 1", , "Warning"
             frmInput.txtTotalAmountPaid.Value = ""
             Exit Sub
         End If
     End If

     If frmInput.txtAmount2.Value <> "" Then
         If IsNumeric(frmInput.txtAmount2.Value) = True Then
             Amount2 = CDbl(frmInput.txtAmount2.Value)
         Else
             MsgBox "You have entered incorrect value for Amount 2", , "Warning"
             frmInput.txtTotalAmountPaid.Value = ""
             Exit Sub
         End If
     End If

     frmInput.txtTotalAmountPaid.Value = Amount1 + Amount2

End Sub

Note that the program needs to check whether the value is numeric or not, only if the textbox is not empty. So in addition to the IsNumeric function we need to use frmInput.txtAmount1.Value <> "" as well. Also the following line has been used to clear the result if there is any invalid value in Amount 1 or Amount 2 textboxes.

frmInput.txtTotalAmountPaid.Value = ""

So now the program displays a warning message if there is any invalid input in the textboxes.

Results will be cleared when click ok.

If you like to learn more about the IsNumeric function, the read this post

IsNumeric Function (VBA Function)

CDbl - Type Mismatch Error When Textbox is Empty (How to Solve)

In the earlier post we learnt why we sometimes get “Type mismatch” error when we convert textbox values to double using the CDbl function. This error can occur due to several reasons.

Read this post if you want to know what the reasons are.

Type Mismatch Error (Run Time Error 13) When Converting to Double

Converting an empty string is one reason for this “Type mismatch” error. In this post I will explain how to avoid the error when a textbox is empty. So let’s consider the following sample subroutine.

Sub TotalAmountCalculationEx1()

     Dim Value1 As Double
     Dim Value2 As Double

     Value1 = CDbl(frmInput.txtAmount1.Value)
     Value2 = CDbl(frmInput.txtAmount2.Value)

     frmInput.txtTotalAmountPaid.Value = Value1 + Value2

End Sub

frmInput is a form. txtAmount1 and txtAmount2 are textboxes. txtTotalAmountPaid is also a textbox. When this subroutine is executed, sum of values in txtAmount1 and txtAmount2 will be displayed in the txtTotalAmountPaid textbox. But this program won’t work if any of those two textboxes is empty. Then it will give Type mismatch error (Run-time error '13'). To avoid this error which occurs when a textbox is empty we can use the following steps. First we can assign value 0 to variables Value1 and Value2. So these will be the default values of the two variables. Then we can use a If statements to check whether textboxes are empty or not. Value will be converted to a double only if the textbox is not empty.

Sub TotalAmountCalculation()

     Dim Value1 As Double
     Dim Value2 As Double

     Value1 = 0
     Value2 = 0

     If frmInput.txtAmount1.Value <> "" Then
         Value1 = CDbl(frmInput.txtAmount1.Value)
     End If

     If frmInput.txtAmount2.Value <> "" Then
         Value2 = CDbl(frmInput.txtAmount2.Value)
     End If

     frmInput.txtTotalAmountPaid.Value = Value1 + Value2

End Sub

In VBA we use <> to check the Inequality. So the following line checks whether the value of txtAmount1 is unequal to "" or not.

If frmInput.txtAmount1.Value <> "" Then

In VBA "" represents an empty string.

If frmInput.txtAmount1.Value <> "" is true then it will execute the below line

Value1 = CDbl(frmInput.txtAmount1.Value)

This is the same for txtAmount2 as well.

Type Mismatch Error (Run Time Error 13) When Converting to Double

Have you get Type Mismatch Error (Run time error 13) when trying to convert a textbox value to a double. (using CDbl function). If so I will explain the reason for that and how to overcome the error.

I will explain this using a sample project. Let’s consider this simple data entry application. Below is an image of the user interface of the program.

Using this application users can select upto two payment methods and then can enter the amounts separately. Whenever “Amount 1“ or “Amount 2“ is updated then “Total Amount Paid” should be updated automatically and instantly. So to do this we can create a subroutine in a separate module and then can use the change events of the “Amount 1” and “Amount 2” textboxes to trigger that subroutine.

Following are the codes of change events of two textboxes.

Private Sub txtAmount1_Change()

     Call TotalAmountCalculation

End Sub

Private Sub txtAmount2_Change()

     Call TotalAmountCalculation

End Sub

And we can put the below code in a separate module. This is a simple subroutine which calculates the total amount.

Sub TotalAmountCalculation()

     Dim Amount1 As Double
     Dim Amount2 As Double

     Amount1 = CDbl(frmInput.txtAmount1.Value)
     Amount2 = CDbl(frmInput.txtAmount2.Value)

     frmInput.txtTotalAmountPaid.Value = Amount1 + Amount2

End Sub

As you can see, the CDbl function is used to convert the values to double. But if we try to enter a value to one of the textboxes, we will get Type Mismatch Error. (Run Time Error 13).


Why does it happen? So the reason is this. We tried to enter a value to “Amount 1” textbox. But at that time “Amount 2” textbox is empty. So when the TotalAmountCalculation subroutine is triggered, the program tries to convert “Amount 2” textbox value also to a double.

Amount2 = CDbl(frmInput.txtAmount2.Value)

But as the “Amount 2” textbox is empty, we get an error. Because CDbl can’t convert an empty string to a double. CDbl can convert only numeric values. For an example following will give Type mismatch error.

Sub ConvertToDouble()

     Dim ConvertedValue As Double

     ConvertedValue = CDbl("122RE")
     Debug.Print ConvertedValue

End Sub

But below will print 122 in the immediate window.

Sub ConvertToDouble()

     Dim ConvertedValue As Double

     ConvertedValue = CDbl("122")
     Debug.Print ConvertedValue

End Sub

Because 122 is a numeric value, but 122RE is not.

So how do we solve the problem with the textboxes. Here are two possible solutions.

1. Convert to double only if the textbox is not empty.
2. Use Val function instead of CDbl

Contact Form

Name

Email *

Message *